Saturday, October 19, 2024

Waffle Flower Halloween Cards THREE Ways!

Welcome class!

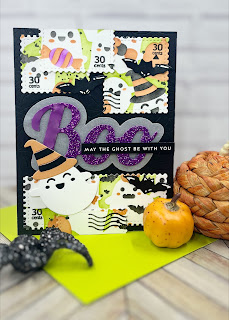
Today's cards are part of the 3 Way Card Hop that I participate in on Instagram, where we are challenged to use the same products or techniques in three different ways.  This month’s hop theme is: Autumn / Spooky Season which is perfect because I love making Halloween cards!  I chose to feature the Sweet Ghosts suite of products from Waffle Flower Crafts this month because I. CAN’T. PUT. THEM. DOWN.


Whether I used them with the Waffle Flower full moon stencil, made a colorful color block with Doodlebug Designs Halloween papers and a Simon Says Stamp grid die, or made a postal collage, they’re super fun to play with! 


Spooky Sweet Wishes!

Welcome class!

Today I’m participating in a Simon Says Stamp release Instagram hop! We’re featuring the Sweet Wishes release. To start from the beginning of the hop, head to Simon Says Stamp's Instagram page @simonsaysstamp!

I jumped on the spooky night sky trend with my card today, featuring the new Halloween Cat die—who needs a man in the moon when you can have a cat in the moon instead?   Let's get to the lesson plan!

1.  Pick your colors.  I used Distress Inks for this project and chose Crushed Olive, Peeled Paint and Black Soot for the background as well as Antique Linen for the moon.
2.  Blend the things!  I started with the moon and used Antique Linen for all 4 layers of the stencil (it's a moon stencil from Spellbinders!).  I started with a super light hand and got heavier applying the ink as I went through the different layers.  I then masked off the moon with the circle that came with the pack and started making the sky with Crushed Olive closest to the moon, then Peeled Paint next, and Black Soot around the edges.  
3.  Splatter the things!  I took some Spellbinders White Splatter and flicked it on my sky to make some stars.  


4.  Die cut the things!  I actually made a second moon that I used to cut out the Halloweeen Cat.  I cut a second one out of Simon's So Very Black cardstock and a third one out of white so I could blend the hat.  The popped up cat in the moon looks much better than the original, that had the cat mounted on Vellum and it looked like it was just randomly floating there. 
5.  Assemble!  I used some Lawn Fawn glitter paper for that fabulous purple glitter sentiment and accented it with some Halloween Reverse Sentiment strip.  A few bats from Simon's Bat Trio and it's a spooky card!


Product Line Up:
 

Wednesday, October 16, 2024

Merry Geometric Christmas

Welcome class!
Today's card comes to you courtesy of the Sweet Wishes release at Simon Says Stamp!  I have been slowly building my Simon Says Stamp stash and I recently added the Geometric Flowers stamps and dies to my collection.  My goal each release is to combine old and new products and I felt this Geometric Flowers set was a great compliment to the new Holiday Messages stamp set from the new release.  A graphic take on a holiday classic:  the pointsettia!


So here's the lesson plan:
1.  Pick your colors.  I used a Sour Apple cardstock as my base, the Green Meadows Pawsitively Saturated Inks paired with Rocket Red from Catherine Pooler.
2.  Stamp the things!  I carefully lined up the stamps from the Geometric Flowers set so that they made a well laid out pattern on the cardstock.  I also stamped the sentiment in Versamark Clair Nocturne ink and clear embossed.  Die cut the things! I paired the dies with the stamp set so that I was able to make a stylized pointsettia.  
3.  Assemble!  Popped up the flower and the panel with foam tape, and tied some twine around the middle for an earthy touch to offset the modern vibe of the card.  A yellow enamel dot in the middle of the flower to make the center and we have a card!

Monday, October 14, 2024

Cozy Polar Wishes

Welcome class!
I have another card coming your way with the Polar Christmas set which is a part of the new Sweet Wishes release at Simon Says Stamp!  I was inspired by a card that was made by Cindy Norberg (@crncards on IG) from last month's Stamptember collabs.  I made sure to tweak things a little bit and changed the orientation from horizontal to vertical, used different shades of blue, and added a few extra penguins for fun.  I love how Instagram is full of great inspiration that you can use to come up with variations on creativity that other people have shared!  Have you ever found a card that sparked your creativity on Instagram, or another sharing platform?


So here's the lesson plan:
1.  Pick your colors.  I used the Blue Skies assortment of inks from Simon Says Stamp:  Marine, Cadette and Royal.  I did the top layer of the snowflake stencil in a super light layer of Marine, then the three colors of inks one right after another.
2.  Stamp the things!  I stamped the inks in Versafine Clair Nocturne and embossed them with clear ink.  Color the things!  I actually reached for my Copic markers for the first time in a long time to color the scarves in rainbow shades.  Splatter the things!  I used a fan brush I dipped in my Black Soot Distress Oxide spray bottle and splattered it over my stenciled panel (the stencil is Simon's Snowflake Stripes).  Die cut the things!  I used the Cozy Wishes die from Simon for the main sentiment in matte silver cardstock.
3.  Assemble!  I popped up the penguins with foam tape along the right side of the card, and accented the die cut sentiment with a Reverse Winter Sentiment Strip from the new release as well.  A few Starshine embellishments do the final trick and we have a card!

Product Line Up:
 

Wednesday, October 9, 2024

Sweet Polar Penguin Wishes

Welcome class!


So here's the lesson plan:
1.  Pick your colors, I went with an orange, yellow, green and blue color scheme--all using Pawsitively Saturated Inks.
2.  Stencil the things!  I used the Scattered Snowflakes stencil and blended my colors across the cardstock horizontally.  Stamp the things!  I used Versamark ink and embossed the pumpkins, which is where my smear problem was. Color the things!  I used my Copics to color these guys in, and also learned that it is easy to smear embossed images while coloring with Copics.  Die cut the things! I used a script Hello die that is new to my stash.
3.  Assemble!  I popped up the penguins with foam tape and mounted them on a panel that was framed with the new black cardstock from Simon--it's SOOOOOO dark black. I accented my sentiment with the new Reverse Winter Sentiment Strips.  A few Starshine sequins and it's a card!

Product Line Up:
The above links are affiliate links, which just helps me fund this hobby at no additional cost to you and create more lesson plans and creativity for all of you--I appreciate your support!

Class dismissed!


More Sunflowers!

Welcome class!
It's been a minute since I've been able to post...my REAL students have had a test recently that I've been working my way through grading and providing feedback.  But I do have a few last cards using the Sunflower Cluster products from Waffle Flower.  I'm still so thankful that I was able to play along with their Sneak Peek club this month!  I had a lot of fun with this pairing as I cut the cluster in pieces to get some new unique looks.


So here's the lesson plans:
1.  Pick your colors.  I used a yellow and orange color scheme for the first card and a straight orange color scheme for the second. All my inks are from the Crisp Inks from Altenew
2.  Stencil the things!  Die cut the things!  The second card uses both Sweet Plaid Texture and Panel dies in the background for a little extra visual interest.
3.  Assemble!  The first card has a layered sentiment accented with gold sequins.  The second stacks two sentiments from Waffle Flower (I love their oversized die collection!) and gold enamel dots in the centers of the flowers. 

Product Line Up:
The above links are affiliate links, which just helps me fund this hobby at no additional cost to you and create more lesson plans and creativity for all of you--I appreciate your support!

Class dismissed!