Tuesday, March 25, 2025

Pretty Purple Thank Yous

Hello, crafty friends! Today, I have two gorgeous thank-you cards to share with you, featuring Kristina Werner’s Pretty Posies Stencils and the Thank You Words Stamp & Die Set. If you love soft, blended florals, bold sentiments, and a touch of dimension, then these cards are for you!  Let's die in, and I'll walk you through the steps to create each one.

This first card has a landscape orientation, with the sentiment stacked in one bold line across the center.

Step 1: Create the Blended Background

  1. Secure your white cardstock onto your work surface.

  2. Position the Pretty Posies stencil and start blending, moving from lightest purple to darkest purple.

  3. Splatter a little bit of silver watercolor to add texture.

Step 2: Die-Cut the Sentiment

  1. Die-cut the THANK YOU from dark purple cardstock.

  2. Emboss the inside outline layer on the dark purple die cut. 

  3. Adhere the letters to the front with foam tape for extra dimension.

Step 3: Add the Finishing Touches

  1. Stamp and heat emboss “FOR EVERYTHING YOU DO” onto a strip of purple cardstock.

  2. Attach with foam adhesive just below the THANK YOU.

  3. Add small die-cut flowers with enamel dots in the center for a cute embellishment.

Tada! One down, one to go!


This card follows the same concept but switches things up by going vertical with stacked letters!

Step 1: Ink Up the Background

Just like the first card, use the second half of the stenciled pattern....I love how you can get two cards out of these stencils!

Step 2: Die-Cut and Arrange the Letters

  1. Die-cut T-H-A-N-K-S from dark purple and emboss the outline letters with silver again. 

  2. Arrange the letters in a stacked formation, spacing them evenly down the center of the card.

Step 3: Embellish!

  1. Add some small floral die-cuts in between the letters.

And there you have it—two unique ways to say thank you with the same supplies!  I love how versatile this stencil and die set are! Whether you go classic with a horizontal layout or modern with a vertical stack, you can create stunning thank-you cards with just a few supplies.

Products used:

Class dismissed!


Sunday, March 23, 2025

Simple Flowers That Pack a Punch

Welcome class!
Today, I’ve got a fun and easy card-making tutorial using Kristina Werner’s Simple Flowers Stencils. These two floral beauties are perfect for sending a little sunshine or heartfelt thanks. If you love ink blending, layered stencils, and a pop of sparkle, you’re going to adore these projects!

Card 1: “Thanks So Much”

Step 1: Create the Background

Start by placing Kristina Werner’s Simple Flowers Stencils over a piece of white cardstock. Using your blending brush, apply Sunflower ink to create soft yellow flowers. Then, go in with Clementine ink to add some warmer orange flowers. Finish off with Grasshopper ink for the leaves.

Step 2: Add Some Splatter & Shine

For added interest, lightly splatter some gold ink onto your background. Let it dry before proceeding.

Step 3: Frame It!

Die-cut a rectangle in the center of your stenciled panel to create a frame. Attach it to your card base using foam tape for extra dimension.

Step 4: Die-Cut & Assemble the Sentiment

Die-cut “Thanks So Much” from Concord and 9th's More to Say dies in brown cardstock and layer it over a shadow layer of vellum for contrast. Adhere it to the center of your framed floral background.

Step 5: Final Touches

Finish it off with gold glitter drops from Pinkfresh Studios for a little sparkle!


Card 2: “Sending Sunshine”

This card is a mix of floral fun and rustic charm with a kraft cardstock background!

Step 1: Create the Floral Section

Wait--you already did this because Kristina Werner is a genius and designed her stencils so that you can get two full A2 panels from one stencil!

Step 2: Add a Kraft Background

Cut a piece of kraft cardstock and use Kristina Werner's Gradual Dots stencil to create subtle texture on the top portion of the card.

Step 3: Layer Your Sentiment

Die-cut “Sending Sunshine” from Altenew's Scripty Sentiments dies (just grabbed this for a steal on a resale page!) in dark brown cardstock and layer it over vellum. Adhere it towards the center of your card where the kraft and floral sections meet.

Step 4: Embellish & Assemble

Wrap some jute twine around the kraft section for a rustic touch and finish with more gold glitter drops.

And That’s It!

There you have it! Two stunning floral cards that are super fun to make and easy to customize. Whether you’re sending sunshine or saying thanks, these designs will brighten anyone’s day. 

Products Used:


Wednesday, March 19, 2025

The Rain or Shine Release is Here!

Welcome class!

If you're looking for an elegant yet vibrant thank-you card design, this project is perfect! Using brand-new products from the Simon Says Stamp's NEW Rain or Shine Release, including the Pretty Poppies Dies, Pepita Background Stamp, and CZ Designs Thank You Basics Stamps, we’ll create a layered, dimensional card with soft ink blending and beautiful floral accents. This release is filled with fresh, spring-inspired designs, making it perfect for adding a cheerful touch to your handmade cards.


So here's the lesson plan:

Step 1: Prepare Your Card Base

Cut a piece of white cardstock to 4.25” x 5.5” to create your standard A2-sized card base. 

Step 2: Stamp the Pepita Background

Using the Pepita Background Stamp, lightly ink it with clear embossing ink and use clear embossing ink and stamp it onto your card base.  I didn't stamp it cleanly as I wanted a distressed look.  Once it's been embossed with clear embossing powder, blend lightly over it with a pastel ink.  I used Simon Says Stamp's Guava ink with a light hand. This adds a subtle texture to the background without overpowering the design.

Step 3: Die-Cut and Ink Blend the Pretty Poppies

  1. Die-cut the Pretty Poppies flowers and stems from white cardstock.
  2. Using your blending brushes, apply Butter Ink to the top of the petals. Then, blend Guava Ink towards the center, creating a beautiful gradient. Add a hint of Punch Ink for extra depth at the petal edges.
  3. Ink the flower centers with light brown ink (Cappuccino and Mocha) for contrast.
  4. Blend green ink (SSS Cabbage and Kale) onto the stems and leaves.

Step 4: Assemble the Floral Arrangement

  • Arrange the poppies on the card in a natural bouquet layout.
  • Secure them with liquid glue or foam tape for dimension.
  • Add a die-cut bow, blending it with Butter and Guava Ink for a coordinated look.

Step 5: Create the Sentiment Panel

  • Cut a strip of vellum to soften the background behind the sentiment.
  • Stamp or die-cut the "thank you" from the CZ Designs Thank You Basics Stamp Set in black ink and heat emboss for a bolder look.
  • Attach the sentiment onto the vellum strip and place it over the flowers using foam tape hidden behind the letters.

Step 6: Add Final Embellishments

  • Scatter pink sequins from the Clematis Embellishment Mix around the design for extra sparkle.

This card combines soft ink blending, subtle textures, and dimension for a sophisticated and heartfelt thank-you design. You can easily customize the color palette to fit any occasion!

Would you try this technique? Let me know in the comments!

Products used:

  • Simon Says Stamp Pretty Poppies dies
  • Simon Says Stamp Pepita Background stamp
  • Simon Says Stamp Clematis Embellishment Mix
  • Simon Says Stamp CZ Designs Thank You Basics stamps
  • Simon Says Stamp Pretty Bows dies

Class dismissed!

Tuesday, March 18, 2025

Happy Birthday to You!

Welcome class!

If you're looking to make a vibrant, eye-catching birthday card, this project featuring Simon Says Stamp's Pretty Bows dies is the perfect choice! With bright colors, embossed details, and metallic die-cut bows, this card is sure to impress.


 So here's the lesson plan:

Step 1: Prepare the Card Base

  1. Cut a piece of white cardstock to create an A2-sized card base (4.25" x 5.5").

  2. Set aside while working on the decorative elements.

Step 2: Create the Colorful Background

  1. Choose seven bright colors of cardstock and cut them into equal-sized rectangles.

  2. Use an embossing folder or background stamp (I used Simon Says Stamp's Flower Burst stamp) to add texture to each colored piece.

  3. Arrange the rectangles in a grid-like pattern on the front of the card base and adhere them with glue or adhesive tape.

Step 3: Die Cut the Pretty Bows

  1. Using the Simon Says Stamp Pretty Bows dies, cut multiple bow shapes from matte silver cardstock.

Step 4: Assemble the Card

  1. Adhere the silver bows over the embossed colored background, ensuring they are spaced evenly.

  2. Die-cut or stamp "Happy Birthday" onto black cardstock and layer it onto a white cardstock backing.

  3. Attach the sentiment towards the bottom center of the card using foam tape for added dimension.

This colorful and sophisticated birthday card is a great way to showcase the Pretty Bows dies while incorporating embossed details and bold colors. Whether you’re crafting for a loved one or building your handmade card collection, this design is a must-try. Happy crafting!

Products Used:
Class dismissed!

Monday, March 17, 2025

A Citrus-y Hello!

Welcome class!
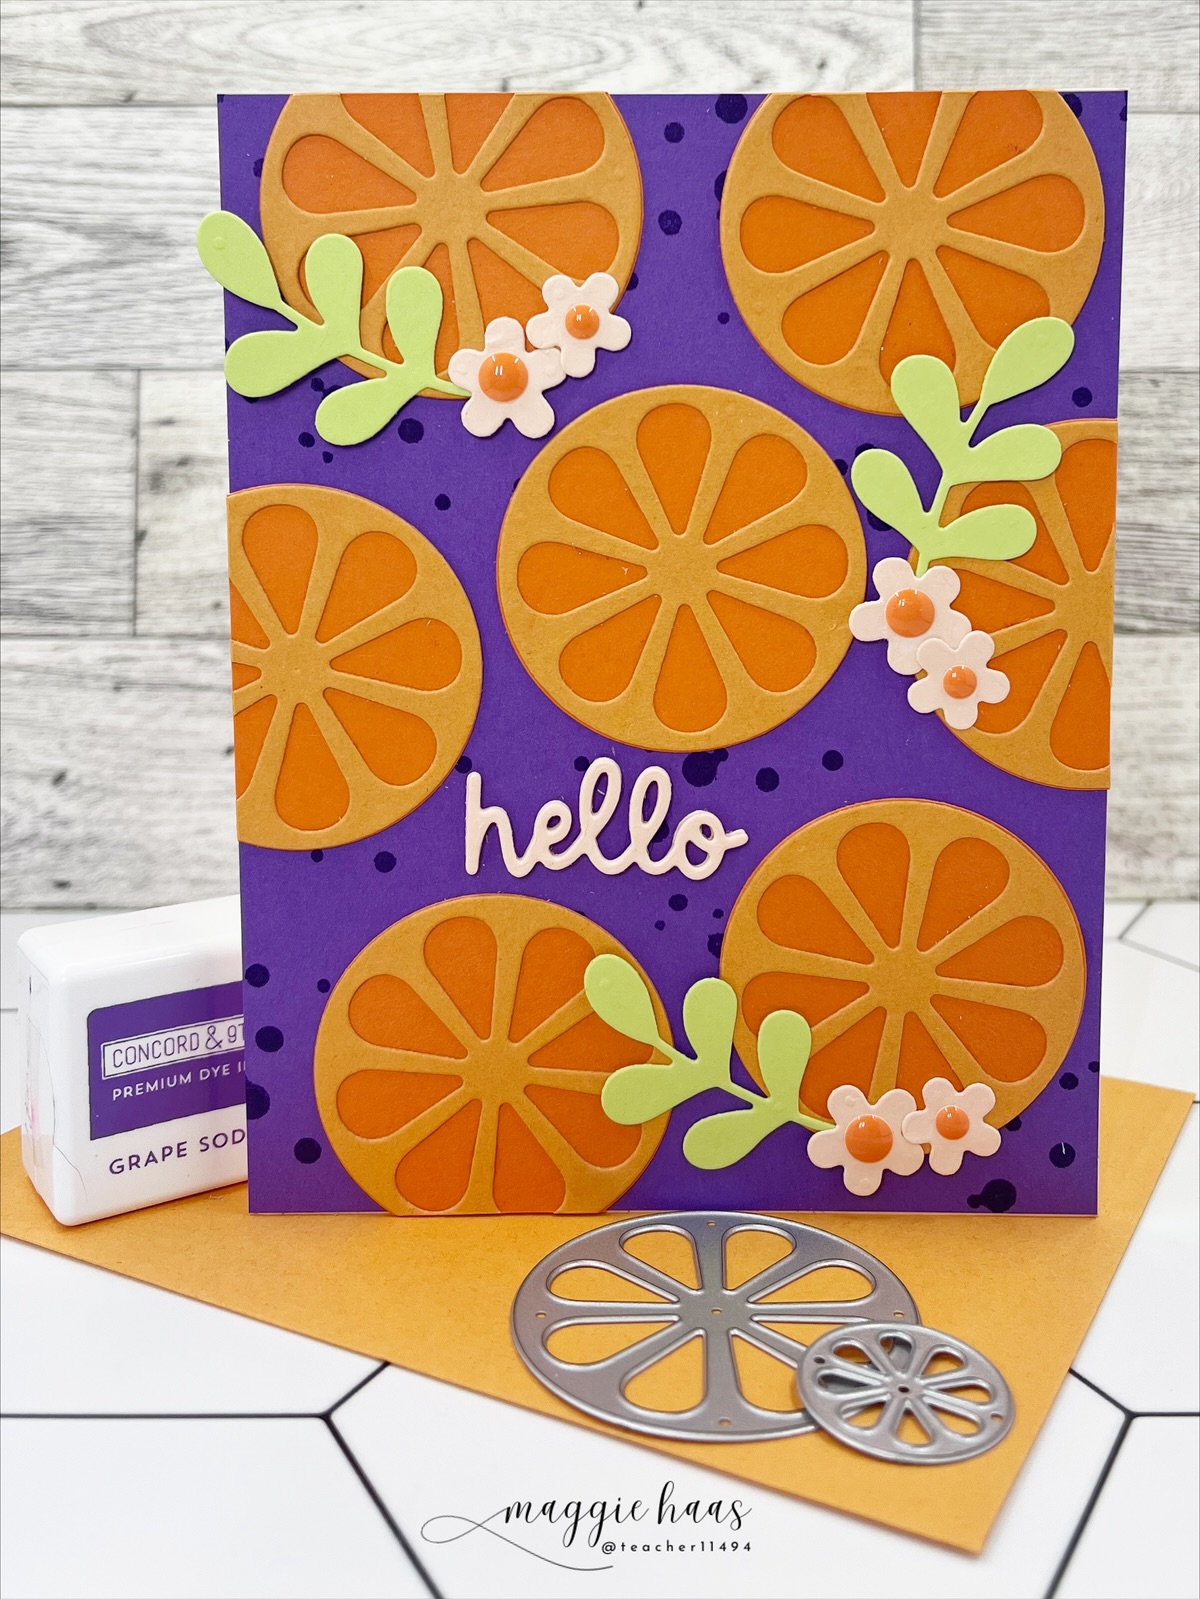
Looking for a fun and bright handmade card design? This citrus-inspired card is perfect for sending a cheerful hello to a friend or loved one. The design is inspired by artist Annie Riker’s beautiful illustration of orange slices on a bold purple background. I loved the fresh, graphic feel of her artwork and wanted to translate that into a handmade card using Concord & 9th’s Citrus Crush dies and vibrant cardstock. Let’s dive into the steps to recreate this juicy design!


 So here's the lesson plan:

Step 1: Create the Background

  1. Cut a purple cardstock panel to fit an A2-sized card base (4.25" x 5.5").
  2. Using the Grape Soda ink, lightly stamp some small dots or splatter-like designs onto the background to add texture. 

Step 2: Die-Cut the Citrus Slices

  1. Use the Citrus Crush dies to cut out the orange slices from The Stamp Market Mango cardstock.
  2. Layer the detailed Concord and 9th Clementine colored die-cut over the Mango base and adhere them together using liquid glue.
  3. Cut out several slices to arrange them randomly on the card.

Step 3: Assemble the Citrus Design

  1. Arrange the citrus slices on the background panel, ensuring they are slightly overlapping for a dynamic look.
  2. Add small Concord and 9th Sprout die-cut leaves between the citrus slices for a fresh, organic touch.

Step 4: Add Floral Accents

  1. Die-cut small flowers from Concord and 9th Nectar cardstock and adhere them around the citrus slices.
  2. Use enamel dots or small adhesive pearls as flower centers to add dimension.

Step 5: Add the Sentiment

  1. Die-cut the word "hello" from Nectar cardstock several times and stack together for dimension.  

Step 6: Final Touches

  1. Adhere the finished panel onto an A2-sized orange card base.
  2. Pair it with an orange envelope to match!

This fun and fruity card is sure to bring a smile to anyone’s face. The mix of bright colors, layered die-cuts, and floral embellishments creates a fresh and playful design. Try experimenting with different color combinations for a lemon or lime version!

Would you recreate this card? Let me know in the comments!


Class dismissed!


Sunday, March 16, 2025

Pocket Full of Hellos!

Welcome class!

Today, I’m sharing a charming handmade card featuring the Pocketful of Mushrooms die set from Simon Says Stamp. These adorable mushrooms add such a whimsical and cozy touch to any card!


So here's the lesson plan:

Step 1: Create the Card Bases

  1. Start with a light green cardstock base measuring 4.25" x 5.5" (A2 size).
  2. Cut a slightly smaller white cardstock panel (approx. 4" x 5.25") and adhere it to the base for a clean border.  My second card was mounted on a Gravel color cardstock from The Stamp Market.

Step 2: Die-Cut the Mushrooms

  1. Using the Pocketful of Mushrooms die set, cut the mushroom caps from white cardstock and blend using Simon Says Stamp's Pawsitively Saturated Inks in Cherry, Fawn and Latte.
  2. Use a white gel pen to add small dots to the mushroom caps for a fun, realistic touch.

Step 3: Assemble the Mushrooms

  1. Arrange the mushrooms in a cluster on the left side of the card, slightly overlapping some pieces for a natural look.
  2. Use foam tape for the larger mushrooms to add depth, while gluing the smaller ones directly to the card panel.
  3. On my second card, the mushrooms are arranged on a mossy green panel that had been stamped with Simon Says Stamp's Friendship Text Background stamp.

Step 4: Add the Sentiment & Background Details

  1. After die cutting the stamped moss panel for one card, I cut a small strip for my second card and adhered it behind the sentiment for a bit of contrast.
  2. Choose a bold "HELLO" sentiment from Simon Says Stamp’s Hello There Sentiment Strips and adhere it with foam tape for dimension.
  3. Stamp a secondary sentimen just below the main sentiment.

Step 5: Add Finishing Touches

  1. Scatter a few clear sequins or embellishments around the design for extra sparkle.

This card is such a fun way to send a thoughtful message to a friend or loved one. The adorable mushrooms paired with the bold sentiment create a simple yet striking design. I hope you give this project a try!

Let me know in the comments if you’d love to see more mushroom-themed card ideas. Happy crafting!

Products Used:

Class dismissed!

Saturday, March 1, 2025

Cute Critters with Poppystamps!

Welcome class!
It's been a hot minute since I've been here in the classroom!  I'm excited to be here today guest designing with Poppystamps for their March challenge!  Thanks for much for the opportunity!  This month, Poppystamps is looking for you to dig out all your cute critters and get to work.  Let's see what I came up with!


So here's the lesson plan:
1.  Pick your colors.  I went with the rainbow between these two cards, with neutrals featured in the backgrounds of each.
2.  Die cut the things! I got silly and die cut several birds using their Nordic Bird die from white cardstock.  Blend the things! I then went for a rainbow theme and blended over all the different parts.  Ink smoosh the things!  I did some basic ink smooshing with acetate on the middle of each card panel--one in grey and the other in tan.  Stencil the things!  I used the Fanciful Flowers stencil set and did a sloppy stencil over the dried ink smooshing in darker shades of grey and tan.  I didn't use all the layers of the stencil because I wanted to keep that background....well...in the background. Splatter the things!  I used black and gold water colors on the background of each.


3.  Assemble!  Once the birds were glued together, they were mounted on the middle of the card with foam tape, and I used black Nuvo drops to make eyes for each of them.  I stacked several Freestyle Hello dies on top of each other for dimension and added it to the bottom of each card.  Two more cards to add to my stash complete!


Want to play along?  Swing by the Poppystamps blog for all the deets!  

Class dismissed!