Monday, July 29, 2024

Cheering Thanks for You

 Welcome class!

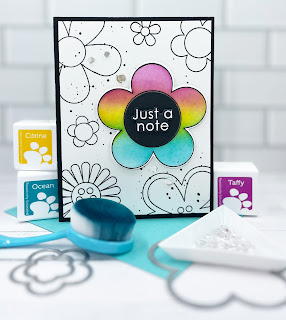
I have another card using new products from this month's Simon Says Stamp Cheering for You release--this time focusing on the acetate cards and the new Pawsitively Saturated Ink cubes....hooray for releasing Cubes in colors previously released....I've been not-so-patiently waiting for these to add to my collection!


So here's the lesson plan:
1.  Stencil the things! I used a pale blue color for my base that helped the colors pop.  I also doodled on them with white gel pen (I'm an Arteza pen user).
2.  Die cut the things!  I stacked my thanks die cut and blended the lightest and second lightest greens in the set on top so that it had an ombre vibe.  I also blended a few shades of the blues in this ink set onto the flowers before I assembled the card.
3.  Put everything together!  I put a die cut on each side of the acetate to keep it looking clean. 
4.  Accessorize with Splash Drops, putting larger ones in the middle of each of the flowers. 

Product Line Up:
The above links are affiliate links, which just helps me fund this hobby at no additional cost to you and create more lesson plans and creativity for all of you--I appreciate your support!

Class dismissed!

Saturday, July 27, 2024

Rediscovery Hop--Summer in Snowflakes!

Welcome class!
I'm here participating in this month's Rediscovery hop over on IG!  The theme for this month is summer cards, or to use stencils.  I went with the stencil option and made this fun fold Christmas card!

So here's the lesson plan:
1.  Pick your colors.  My favorite came back here:  Snow Cone and Cotton Candy from Taylored Expressions.
2.  Emboss the things!  I used the Noel Print background stamp from Hero Arts and embossed it with clear embossing powder.  This white cardstock layer is 4 x 5 1/4.  
3.  Stencil the things! I used Picket Fence mini paper pouncers to help me with this detailed Taylored Expressions Winter's Beauty snowflake stencil right on top of my text background.
4.  Cut the white layer in half so you have 2 pieces that are 2 x 5 1/4.
5.  Fold the things.  The card base is 5 1/2 x 8 1/2.  Crease each side of the cardstock at 2 1/4 to make the gate opening.  If this looks familiar, I watched a recent Jennifer McGuire video where she made a card in this format and I had to get going and make my own before I finished watching!
6.  Assemble your card!  Glue your embossed and stenciled pieces onto your flaps with the edge lined up to the middle so that you have a border surrounding it.  Take your sentiment (mine is from Concord and 9th's Holiday Sayings and cut out of white glitter cardstock) and mount it on a 1 x 2 piece of cardstock that is folded in half.  This allows your sentiment to float!

Product Line Up:
The above links are affiliate links, which just helps me fund this hobby at no additional cost to you and create more lesson plans and creativity for all of you--I appreciate your support!

Class dismissed!


Friday, July 26, 2024

Just a Note about the Cheering for You Release

Welcome class!
I've got another card for you using products from the new Cheering for You release from Simon Says Stamp!  This one combines two new products--the Music stamp set and A2 acetate cards...let's find out about it!


So here's the lesson plan:
1.  Pick your colors.  I went with black and gold for the neutrals, and Kitch Flamingo, Abandoned Coral and Fossilized Amber.
2.  Stamp the things!  I stamped the background panel first, then blended over it with the Distress Oxide colors.  I spritzed a little Picked Raspberry and Fossilized Amber Distress Spritz over the panel too (trust me, it's there....hard to see in this pic!)
3.  Emboss the things on the acetate panel!  Don't be afraid to use your powder tool all over before you emboss on acetate so you can avoid all the strays.  Make sure to completely heat up your heat tool for about 45 seconds, and then keep it moving while the powder is melting to avoid heavy warping. 
4.  Die cut the things!  I used CZ Design's Just a Note sentiment because it fit the music note theme of the set I was sent.
5.  Assemble the card.  This is actually technically a trifold card as the note card on the inside is glued in with the fold line on the RIGHT side.  I watched a Jennifer McGuire video that gave me the inspiration for how I put this together. 

 Product Line Up:
The above links are affiliate links, which just helps me fund this hobby at no additional cost to you and create more lesson plans and creativity for all of you--I appreciate your support!

Class dismissed!


Wednesday, July 24, 2024

Cheering For You...With Music!

Welcome class!
I'm bringing some inspiration to you today using products from the new Cheering for You release from Simon Says Stamp!  I'll be featuring the new Music stamp set this month, and here's one of the cards I made with it!


So here's the lesson plan:
1.  Pick your colors:  I used my go to rainbow of colors from Concord and 9th for the cardstock strips, but I used a rainbow of Pawsitively Saturated Inks for the hearts (colors linked below).
2.  Stamp the things!  Since I was going to be using water I used Tim Holtz Watercolor panels for this. Emboss the things!
3.  Make the watercolors run.  So I smooshed my ink pads on my glass mat to get the color and I put a small drop of water in each heart.  I highly recommend embossing your image if you try this as the embossing makes a little pool so your water and color stay where you want them to.  I then picked up a small amount of ink on my damp brush and dropped it in the pool in each heart.  I then took a CLEAN brush and made a small water color trail coming from each heart.  Next, I dropped a small amount of ink in each one with my brush and it followed the water trail, so it went exactly where I wanted it to go!
4.  Cut on a diagonal.  
5.  Frame your image with 1/8 inch cardstock strips.
6.  Admire your handiwork!


A Sunny Thank You

Welcome class!
I have a sunny Thank you card using some old and new products from Simon Says Stamp...and as you'll see here a lot of old products from my stash too!


So here's the lesson plan:
1.  Pick your colors.  I used the Yellow Sunsets Pawsitively Saturated ink cubes from Simon Says Stamp, along with Taylored Expressions Snow Cone and Cotton Candy.
2.  Stamp the things!  Die cut the things!  Ink blend the things!  Emboss the things!
3.  Assemble the things and accessorize with Starshine embellishments!

Where did the clouds and cloud border come from?  Class, I do not know.  I store my die cuts in clear pockets by category and for those, I got rid of the original packaging so I can't trace it back to a single manufacturer. 

 Product Line Up:
The above links are affiliate links, which just helps me fund this hobby at no additional cost to you and create more lesson plans and creativity for all of you--I appreciate your support!

Class dismissed!

Saturday, July 20, 2024

Rainbow Flower Power!

Welcome class!
Today I'm posting some card I made back when I was on my Simon Says Stamp Flower Power kick a few weeks back.  I made so many different ones that I didn't want y'all to get bored with them being all you'd see.  Variety is the spice of life!

So here's the lesson plan--Card 1:
1.  Pick your colors.  I went with a rainbow blend using all Concord and 9th products:  Dragonfruit, Poppy, Clementine, Buttercup, Sprout, Aqua Sky, Blueberry and Fig. 
2.  Stamp the things!  Emboss the things! Stencil the things! Die cut the things--both flowers and rectangle bars from the sentiment set!
3.  Carefully space out all the cardstock bars.  I can't believe that they all spaced evenly on here.  
4.  Stamp the sentiment (from Simon Says Stamp Airy greetings).
5.  Assemble and embellish with Starshine embellishments!


So here's the lesson plan--Card 2:
1.  Pick your colors.  I only used three colors for this one, seen in the photo:  Pawsitively Saturated Inks in Taffy, Citrine and Ocean.
2.  Stamp the things! Emboss the things!  Stencil the things!  I stenciled a second flower so that I could die cut it out and pop it up with that sentiment in the middle!
3.  Ink splatter the background so that it isn't as stark with just the flowers and the white space.  
4.  Assemble!

EXTRA CREDIT!
On the first card, I went back with a black detail Copic pen and added some doodles to the flower centers and it just made them pop.  Highly recommend doodling on sold images such as these.  

Product Line Up:
 

Friday, July 19, 2024

Lazy Crafting--LOL!

Welcome class!
So I had the Daisy stencil on my desk from my last card, and since it was already there I made another card with it.  Lazy crafting for the win!


So here's the lesson plan:
1.  Pick your colors.  This one uses Taylored Expressions Snow Cone, Cotton Candy, Kiwi and Lime Zest, along with some Lemon Meringue enamel dots for the flower centers. 
2.  Stencil the things!  I stenciled on both the white layer and only did the flowers on the blue layer.  When each is cut in half they line up perfectly!
3.  Die cut the things!  Emboss the things!
4.  Assemble the card.  I did a layered sentiment on this one using the Oversized Hey Hi Hello dies and the Sentiment Additions set, both from Waffle Flower

Product Line Up:
The above links are affiliate links, which just helps me fund this hobby at no additional cost to you and create more lesson plans and creativity for all of you--I appreciate your support!

Class dismissed!
 

Wednesday, July 17, 2024

Pretty in Pink Postage

Welcome class!
I'm not usually a pink person, but for some reason I really wanted to make a monochrome pink card using the new-to-me Oversized Postage products from Waffle Flower Crafts, along with the Layered Daisy dies I got off of a resale page.  

So here's the lesson plan:
1.  Pick your colors.  I went with Concord and 9th Briar Rose, along with The Stamp Market's Blossom and Citrine for the flower centers.  
2.  Die cut the things!  Stencil the things!  I went with just the floral layer from Waffle Flower's Daisy stencil so that there was something more on the card base.  Stamp the things!  Since I wanted this to look like one fancy stamp, of course it needed some postage.
3.  Get to work assembling.  I layered my die cuts and glued them together, trimming the edges off of two of the flowers so they would fit.  I did have the sentiment, from Sweet Lattice Sentiments from Waffle Flower, hanging off the edge tho.  
4.  Accessorize with my favorite Starshine embellishments from Simon Says Stamp and it's a card!

Product Line Up:

The above links are affiliate links, which just helps me fund this hobby at no additional cost to you and create more lesson plans and creativity for all of you--I appreciate your support!

Class dismissed!
 

Monday, July 15, 2024

AAA Colourful Challenge #6


Welcome class!

It's time for another AAA Colourful Challenge!  This month has a warm sunset, and where I went pretty literal last month, I went off the grid and was just focused on colors this month, featuring an Alex Syberia floral die set, along with a Waffle Flower Crafts foil plate and a Simon Says Stamp sentiment. Let's get to it!

So here's the lesson plan:
1.  Pick your colors.  The challenge made it easy!  I used Cayenne and Spiced Cider (Concord and 9th) for the oranges, and Buttercup and Sunflower (Concord and 9th) for the yellow, along with an assortment of greens from my stash.
2.  Die cut the things!  Blend ink on the die cut things for dimension! Hot foil the things!  Hot foil tip:  use a shim to ensure you're getting even pressure as you feed your plate through the die cut machine.  I've had my Crafter's Companion foil set up for a few years now and I've done a LOT of trial and error to get a temperature and sandwich that works.  The combo?  Medium heat, 30 seconds, add a metal shim!
3.  Glue everything together, and use a tiny stamp for the sentiment as the dies are the focal point for this card.  I'm obsessed with the tiny thanks!
4.  Embellish with a few Spellbinders gold sequins and you have a card.


Product Line Up:

The above links are affiliate links, which just helps me fund this hobby at no additional cost to you and create more lesson plans and creativity for all of you--I appreciate your support!

Class dismissed!

Sunday, July 14, 2024

Flex Those Alphabet Dies

Welcome class!
I recently got my first order from Alex Syberia Designs in the mail and combining that with their Christmas in July IG challenge, I wanted to create a Christmas card.  But I have no Christmas stamps.....alphabet die set to the rescue!
So here's the lesson plan:
1.  Pick your colors.  I went with Concord and 9th Evergreen and Avocado, along with a random green where the label fell off the pocket in my card stock stash.  
2.  Die cut the things!  Carefully use your Simon Says Stamp mini T ruler to line up all the things!
3.  Accessorize with red pearls from Taylored Expressions to play the role of ornaments.  Die cut a star out of gold cardstock for a star.  Ta da!

Product Line Up:
The above links are affiliate links, which just helps me fund this hobby at no additional cost to you and create more lesson plans and creativity for all of you--I appreciate your support!

Class dismissed!


Friday, July 12, 2024

Christmas in July Starts….Now!

Welcome class!
About 20 years ago I started making all my holiday cards in July as I had left it to the last minute one too many times and it made a frantic time of year even more so.  I'm in the middle of making all my holiday cards right now, and I broke my spending freeze to take advantage of the Christmas in July release from Waffle Flower Crafts.  If anyone from there sees this, brilliant marketing for people like me who never buy holiday stuff in the fall because my cards are already done!  I'm a sucker for their postage stamp collection, so these snowmen had to come home. 

So here's the lesson plan:
1.  Pick your colors.  I went with a traditional blue for this one using Simon Says Stamp Pawsitively Saturated Ink colors. 
2.  Stencil the things!  Stamp the things!  Use glitter paste on the things (I used some Nuvo glitter paste for the snowflake)!
3.  Assemble the card and add in some layers underneath the stamps, and tie some twine on the right for extra interest.  An easy WOW card!

Product Line Up:
Class dismissed! 

Tuesday, July 9, 2024

A Little Birdie Had Some Inspiration

Welcome class!
My bestest crafty friend was recently on vacation and sent me a picture of a pillow from one of the places she stayed and challenged me to make a card with the Concord and 9th Tweet Life set.  Since this is one of my all time favorite products from C9, I went for it!
So here's the lesson plan:
1.  Pick your colors.  I was guided by the pillow and went with an assortment of Taylored Expressions, Pinkfresh Studios, and The Stamp Market ink Cubes.
2.  Stamp the things!  Emboss the things because you used Versafine Nocturne ink!  Stencil the things! Embellish the things!

It's not a perfect match to the pillow as there was a lot of white wing action there, but I'm happy with the random colors in this card, and it is getting ready to head to its recipient at the end of the month!


Product Line Up:
 

Monday, July 8, 2024

One Background, Two Ways

Welcome class!
I have a few cards here today using the Wonky Circle background stamp from the Sunny Vibes release over at Simon Says Stamp.  I had the same idea with each card, but went with two different themes.  Let's see what we have...

So here's the lesson plan(s):

CARD 1
1.  Pick your colors.  I went with oranges and yellows from Simon's Pawsitively Saturated Inks line (see the product links below for the exact set).
2.  Emboss the things!  Stamp the things!  Die cut the things!  I embossed the wonky circle background on both cards with a Versafine Nocturne (black) inkpad and embossed it with clear powder before I blended over it. 
3.  I actually blended over the sun and the sentiment so that the stark white wasn't too much for me.
4.  I added in some white glitter clouds and starshine embellishments to finish it off.

CARD 2
1.  Pick your colors.  Again, I went with some Pawsitively Saturated inks in Marine, Cadette and Royal.
2.  Stamp the things! Emboss the things!  Die cut the things!
3.  Assemble the focal point.  This uses the Earth die from the Sunny Vibes release.  I came up with a hack to glue it together....put your blue and green pieces in the die cut, dab some glue on them, and put a slightly smaller circle on top.  Ta-da!  Made this AP Geography teacher happy to see the continents in the right spots!
4.  Before assembling the card, I sprinkled some water on top of the blue blended background to give it a watery look as I was going for an ocean vibe in the background.  

Sunday, July 7, 2024

Ink Blended Birthday

Welcome class!
Today's birthday card is a great mashup of products from three companies:  Pinkfresh Studios, Simon Says Stamp and Waffle Flower Crafts.  Let's get to it!
So here's the lesson plan:
1.  Pick your colors.  I went with a green and pool color scheme using Pinkfresh inks as I knew the colors would blend well.
2.  Emboss the things!  Do the text background first so that when you emboss the powder sticks where it's supposed to and not all over your card front.  Die cut the things!  Ink blend the die cut things!
3.  Get after that stenciled background.  I needed to get my Overlapping Geometrics stencil set from Pinkfresh inky so I started with the lightest green, then lightest pool, mid green, then mid pool, then dark green, then dark pool.  They blended together beautifully.
4.  Assemble the card and enjoy what you made :)

Product Line Up:

Saturday, July 6, 2024

Rainbow Shells

Welcome class!
I'm back with another project using the Beachcomber set from Simon Says Stamp's Sunny Vibes release!  I went with my old pal Roy G. Biv and made a rainbow of shells for this one!  Let's get started!

So here's the lesson plan:
1.  Pick your colors.  I went with the rainbow and dug out my tins of Simon's Pawsitively Saturated Inks.
2.  Stamp the things (with Versafine black so you can...)!  Emboss the things!  Die cut the things!  With these seashells I highly recommend stamping the outline then going back with the color.
3.  Assemble your rainbow of shells.  
4.  I had in mind a simple black strip with a white embossed sentiment across the middle.  I recently went through my stamps for a destash and placed all my sentiment stamps in a single basket on my desk so I can reach for them easily.  I've been reaching for this CZ Designs Emphatic set a lot lately.  Just realizing that I used that same sentiment on a card I haven't posted yet!
 Product Line Up:
The above links are affiliate links, which just helps me fund this hobby at no additional cost to you and create more lesson plans and creativity for all of you--I appreciate your support!

Class dismissed!

Friday, July 5, 2024

One Stamp Set, THREE Ways!

Welcome class!
Today I'm bringing you three versions of the same card....but using different colors with each to get a completely different look!  I used the Blooms for You set from Concord and 9th that was released last year....I hadn't touched it until last week when I made these cards, and I can't wait to make more with it!  My mom requested a stack of birthday cards, and that send me down the path that create these.  

So here's the general lesson plan:
1.  Pick your colors.  I dug into my Color Cube and used three different combinations of Concord and 9th inks.  Card #1=Eucalyptus, Juniper, Oceanside, Peacock and Aqua Sky.  Card #2=Sprout, Rainforest and Clementine with a little Stamp Market Poolside and Waterfall tossed in.  Card #3=Poppy, Watermelon, Midnight, Blueberry and Harbor.
2.  Stamp the things!  Emboss the things!  Die cut the things!


3.  For each card I stamped the shadow of the you and used coordinating cardstock stacked for the "you" sentiment.  I also used the new Concord and 9th Diagonal Shortcuts to make that sentiment strip which uses an old Stamp Market mini sentiment set. 

4.  Pop up, assemble, and admire your handiwork!

Product Line Up:
The above links are affiliate links, which just helps me fund this hobby at no additional cost to you and create more lesson plans and creativity for all of you--I appreciate your support!

Class dismissed!